
Frequently Asked Questions - Public
Yes! If you are going to use both apps you'll want to use the same account for both. This will be important when we have a sync service to keep the two apps automatically updated.
If you've already registered the app on one device, you can view it to use on the second device. To view your username on the iPhone, tap on More => Owner Info and your username is a read-only value shown at the top of the screen. On the iPad app, it's on the Owner Record screen. If you cannot remember your password, you'll have an opportunity to reset it during the installation. Or, you can find this on the iPhone app under More => Manage Security => Reset Password. Or, in the iPad app under Tools => Manage Security => Reset password. If you no longer have the app installed and need to know your username, please contact us at [email protected] and provide your email address used when you registered the app.
Backup My Stuff is an add-on feature that you can subscribe to that will keep all of your data stored safely. Finally an app where you can back up your info that is INSIDE of the application. Not just the app itself to where all of your vital "stuff" is gone and never to be found again. Not only does it backup your data, but it saves all of your app settings, pick lists and customization you've done to make VIPorbit work for YOU.
Also, Backup My Stuff archives EVERY individual backup you do. Giving you the peace of mind that no matter what, you will never lose your information.
Note: A Wifi connection is required to Backup and Restore. If a Wifi connection is not available you will receive an error message saying it cannot connect to the server. This is for your protection to prevent any excess data usage with your cellular carrier.No, the free versions of VIPorbit for iPhone and iPad have every feature available in the full version. While the free versions are full-featured, they are limited to 100 contacts. If you have a question regarding a specific feature, please contact Support before upgrading. We're working hard to build a satisfied VIPorbit user community and want to help you make a confident purchase!
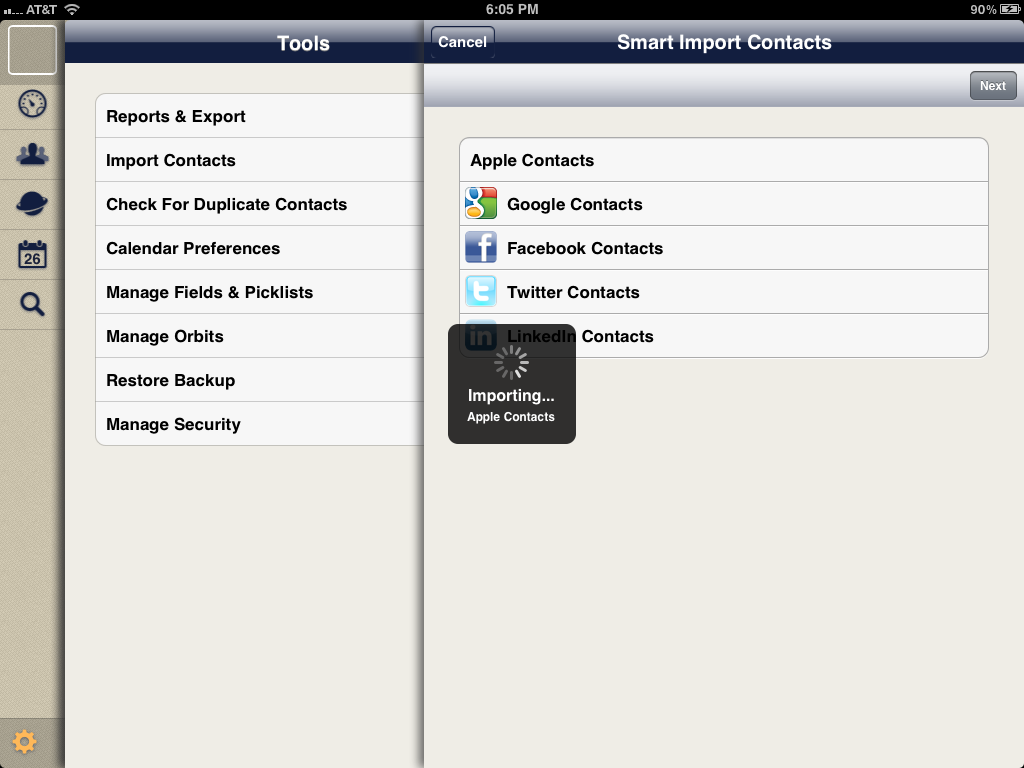
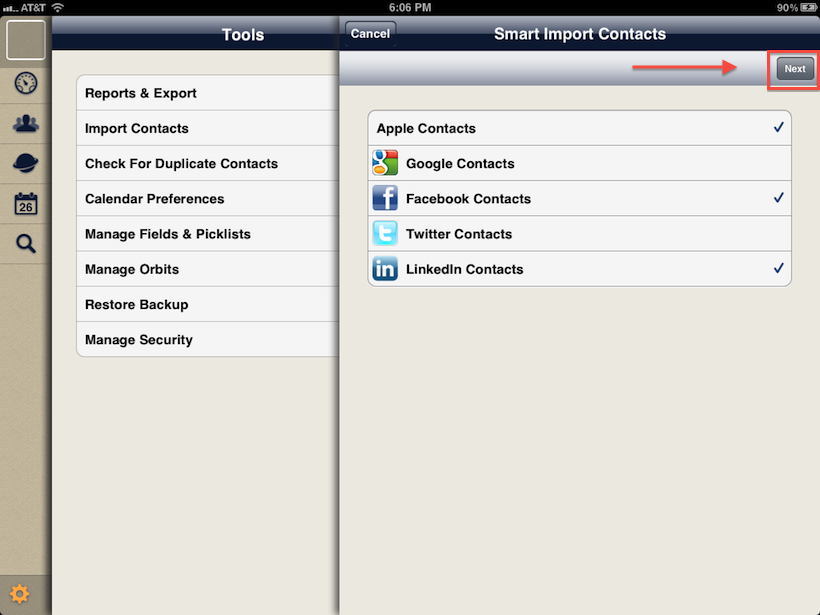
Step 1 - Select your contact source(s), log in (if applicable) and when complete, tap the Next button to continue
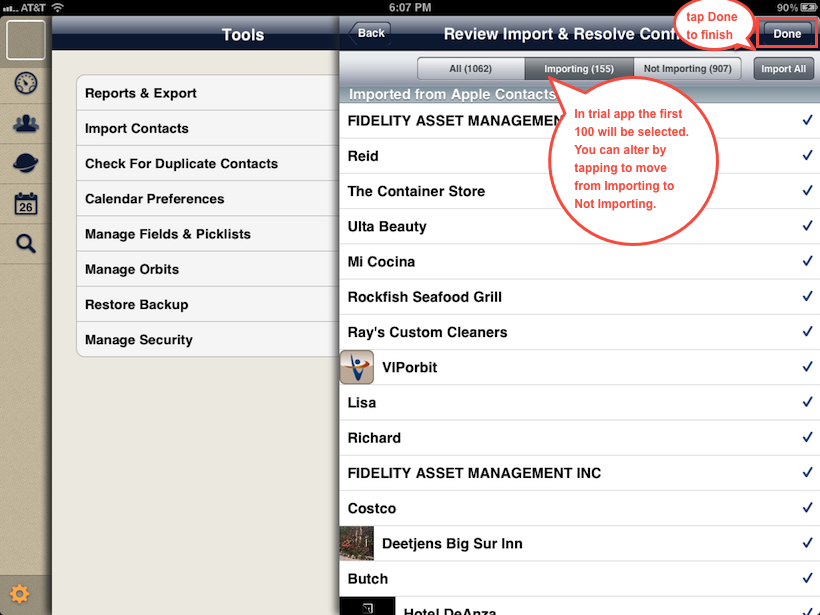
Step 2 - This is the final screen. The first 100 contacts will be checked if you're using the free/trial version under Importing. The rest will be under Not Importing. Duplicates (matches on first and last name) will also be under Not Importing. You can change any contact from one list to the other by tapping on them. When you're satisfied with what is selected, press Done in the top right corner to complete. You always have the option to tap Import All as well.
.
Backup My Stuff (BMS) does just as the name implies. Use BMS to safeguard your data against loss and to retrieve your contacts if you change devices. BMS does not sync the data between devices. We currently have a product in development that offers true sync capabilities. If you want to use VIPorbit on your iPhone and iPad at the same time before the release of the sync product, we recommend you use the iPhone product on both devices and employ BMS to keep the data consistent on both devices. For more about using the iPhone version of VIPorbit and BMS to maintain data consistency between devices, read http://bit.ly/x8Md9X
Why yes it is :-) Ok, this is an oops. Our February month calendar view on the iPhone incorrectly stops at Tuesday, February 28th, showing Wednesday as March 1st. The good news is on the Day, List and Custom views Wednesday, February 29th is correctly acknowleded and can be used for scheduling. Also on the March monthly calendar view, the 1st shows correctly on Thursday. We'll be sure and get this corrected prior to 2016.
Yes we can! There is an issue with how messages are sent that was introduced with iMessage in iOS 5. Prior to sending a text message to an Orbit tap on Settings => Messages and make the following changes:
- Turn off "iMessage" (send text messages to other iOS 5 devices via wifi)
- Turn off "MMS Messaging" (sending pictures via text)
- Turn off "Group Messaging" (being able to see all participants on the group message and reply all)
After your message is complete, you can go back into Settings and turn these features back on if you desire.
We sure can! This happens in any app if you're using a Bluetooth keyboard with your iPhone or iPad. If you disconnect the keyboard or turn blu-tooth off your device's keyboard will pop up and start working again.
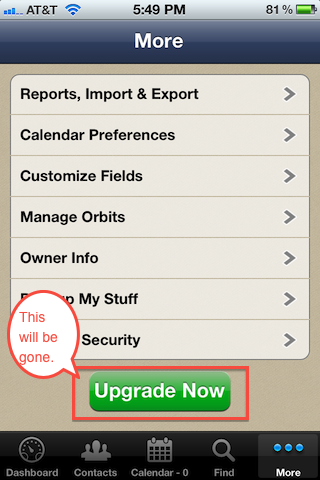
If you have the iPhone app: We have two versions of VIPorbit on the App Store for your iPhone, a Full and a Lite (try-before-you-buy). Please note, these are SEPARATE apps meaning if you download the Lite/free version and upgrade then decide to download the other full version later and pay again, you will be charged again. If you have to reinstall for any reason or your installing on another device, you MUST download the version you started with.....if you paid up front for the app then that was the full version. If you downloaded for free then decided to upgrade inside the app, this is the Lite version. As long as you download the same one you originally made your purchase from, you won't be charged again. On the Lite version, you will have to tap Upgrade Now to go through the process but you'll get a message saying you've already paid for this app and can download again for free.
Here is the screen on the Lite app with the message:
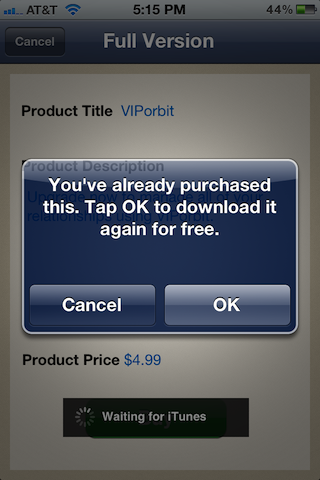
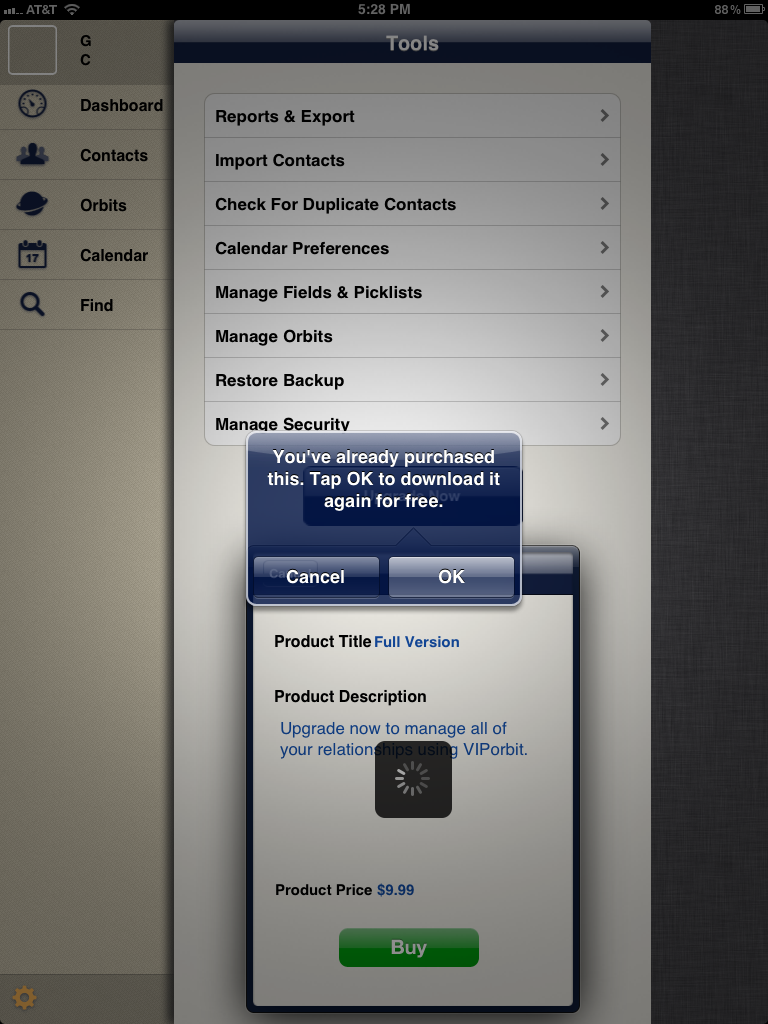
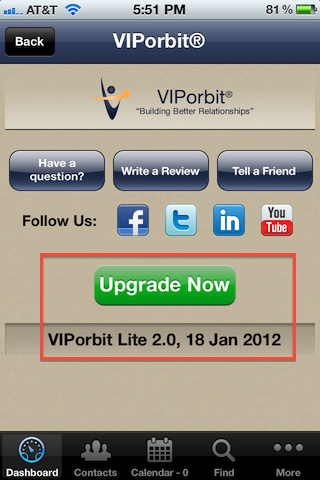
If you have the iPad app: The new iPad app has just one version and it's always a free download, a try-before-you-buy, like the Lite version we offer on the iPhone app. The same rules apply as mentioned above. If you have to reinstall for any reason after you've purchased the upgrade in the app, you'll have to go through the upgrade process again but you won't be charged.
Here is what the screen looks like when you're upgrading after previously purchasing:
- An updated, clean-look user interface with an easy-to-use Contact Dashboard
- A Today button to go straight to all of your activities for the day
- Contact screen: drop-down menu is gone replaced by a Contact Summary with quick-tap Call and Email buttons at the top
- Tapping the Orbit icon on the Contact List toggles between an alphabetical and user-defined Orbit list order
- Completing Activities
- Tap a new Follow-up button when completing an activity to schedule a follow-up
- Records all contacts in each person's Log who were participants in that activity
- A new reported added - Completed Activities - which compiles completed activities for all contacts, an Orbit, or a custom Find and also by a custom date range
- New tasks for entire Orbits include:
- Send Email or SMS to all contacts in the Orbit
- Note: The first email or phone for the contact defaults to Primary for these bulk tasks. Only one can be the primary. Before sending an email or an SMS to the Orbit it's recommended to review the values designated as primary. A log entry will be added to each contact that it was sent or not sent (if for example a contact didn't have any email addresses).
- Regarding Group SMS messages: Due to an issue introduced in iMessage in iOS 5, if you want to send messages to a group of people you must change your Settings > Messages to:
- Turn off "iMessage"
- Turn off "MMS Messaging"
- Turn off "Group Messaging"
- Update contact data for the entire Orbit for all the contacts within
- Send Email or SMS to all contacts in the Orbit
- Country added to Find search criteria
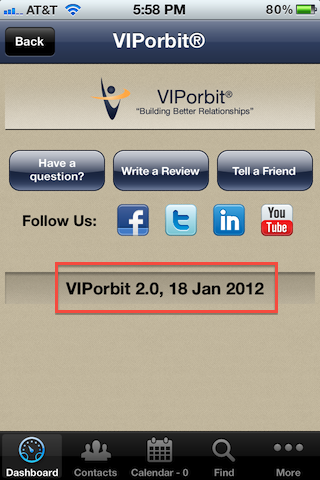
The name of an app icon doesn't change even though the internal contents do. You know you have the update if you can enter more than 100 contacts. Also, if you tap on the i on the Dashboard the product name and date will be changed from VIPorbit Lite 2.0, 18 Jan 2012 to VIPorbit 2.0, 18 Jan 2012 and the green Update Now button will be gone. Please do not download the other VIPorbit iPhone app that is the full version as iTunes see's this as a separate purchase and you will be charged twice.
Here are a few before and after screen shots:
.
Please note: this is referring specifically to the iPhone app, not the native iPad app we've now released.
Great questions and the first answer is yes! While it was originally designed for the iPhone in a single user situation, we're happy to provide you the workaround to use it on both devices with one app. (Meaning you don't have to purchase two copies of the app.) Follow the detailed instructions below and you'll be up on your iPhone and iPad in no time. Please note a few details first.
A few details:
- This assumes you are using the same iTunes account on both devices.
- Please note that this is a file-based sync meaning you can only use one device at a time, not simultaneously to keep your data current.
- Please have an active wifi connection before you get started.
- You perform the setup completely on the first device before moving to the second.
- Make a note of the username and password you entered on the first device while loading the app.
Now, let's get going:
(These instructions have you setting up the app first on your iPhone but it can be either one. If you started or want to start with your iPad first, just flip the words iPhone/iPad around)
- With VIPorbit already running on your iPhone, tap the red Backup My Stuff button to purchase the service, it will ask for your iTunes password, and should start the backup/upload automatically when the purchase is complete.
- Verify the backup was successful by tapping on More => Backup My Stuff and tap the Restore button. You should see the date/time of this backup and the number of contacts.
- Now go to your iPad, if you had previously downloaded and installed VIPorbit here, delete it. We have to reinstall so it recognizes your purchase of Backup My Stuff.
- Next, download VIPorbit straight from the App Store. Make sure you download the same version you started with on the iPhone . What does this mean? iTunes see's our Lite/Free and Full apps as different products. So, if you started with the free/lite version then go that route, if you started with the paid/full then select that. As long as you keep with the same product you started with, you will never be charged for the app again regardless of how many times you download it. If it's the free/lite verison you started with, you will have to tap Upgrade Now and go through the Buy steps but you won't be charged again. For more details and screen shots on this, click here: http://bit.ly/yrerdk
- When you tap to load it, make sure you log in with the same username and password you used for the iPhone installation of VIPorbit.
- After logging in, select your Country, then tap the Restore button and you should see the backup you just uploaded from the iPhone. Tap it and it will have you restart VIPorbit. Once you reload you will have the same data on both devices. You can see screen shots of this under our FAQ that starts with "I have a new iPhone"
- Going forward you'll need to backup and restore when going from one device to the other. Scenario: I've been using VIPorbit on my iPad while at my office. Now as I'm leaving for the day, in VIPorbit I tap Backup My Stuff on the Dashboard on my iPad. On my iPhone, in VIPorbit I tap More => Backup My Stuff and tap the Restore button and tap on the backup I just uploaded. Now I'm headed out armed with my latest changes on my iPhone!
Yes! Your iPhone 4S supports dictation in any app that has a keyboard. So instead of typing, you can speak and your words will be entered as text.
To start dictation, tap the microphone button on your keyboard and start talking. When you’re finished, tap Done and your words will be turned into text.
This can be used anywhere in VIPorbit the keyboard is accessed. A specific example: You've just received a call from a client. You want to log the call on your client's contact in VIPorbit and you want to add some detailed notes regarding the conversation. You go to the contact, tap the menu, tap Log and the plus to add a log. At the bottom you tap on Notes and your keyboard will pop up with the microphone to access Siri. You speak your detailed notes for the call and press Done to save.
Think about it - by speaking your words via Siri, you're probably going to elablorate with more valued content than tapping mispelled words on the phone's small keyboard. That added value might enable you to secure future business with this and all your clients going forward!
Want to see it in action? Click below to watch a video of Siri in use with VIPorbit.
Backup My Stuff looks for an active wifi connection to use for backup and restore. If it cannot locate one you'll receive the message(s) "Wifi not available - Backup My Stuff server cannot be reached." on a backup and "Wifi not available - Backup cannot be restored." on a restore. (See screen shots below of examples.)
This is by design for your protection to prevent excess data usage with your cellular carrier, especially costly roaming data charges while traveling.


.
Yes! Now with the latest version (V1.3) groups in your iPhone's Address Book will import into VIPorbit as orbits! This will maintain your existing groupings and will still show a complete list of your contacts in the All orbit.
Don't have any groups in your Address Book? You can achieve this a number of ways whether you're using Windows or Mac:
- On a Mac you can manually create groups in your Address Book application and they will appear in iTunes under Sync Address Book Contacts to select. Please note: If you're syncing with additional sources such as Exchange, doing this might duplicate your contacts so make sure this is not the case. For more information, see our FAQ titled "Why Do I Have Duplicate Contacts After Importing?"
- If you're using Outlook:
- Mac - Using Outlook 2011, you've already selected the contact files you want to sync with. If you label your contacts in Outlook using Categories, those Categories will show up as Groups. Please consult Microsoft Outlook technical resources for specifics on how to do this.
- Windows - Using Outlook 2007 and higher (we tested with 2010) your different contact files will show up as groups. You can easily create a new contact file and copy the contacts you'd like to be in a group. For detailed instructions, please consult Microsoft Outlook technical resources.
One alternate way to go about this would be to put the contacts in an orbit. This way you have a list of every contact you need to call with one tap. You tap the contact you want to start with, tap the phone number and you're off making calls and working your list. When you end your call and return to VIPorbit, you will have a Log entry on that contact showing the date and time of your call. You can tap to edit and add to the Log entry if you like. When you're ready to go to the next contact call, remove the contact from the orbit and continue. This way you always know exactly who is left on your "list" to call. When all of your calls are complete, you can delete the orbit.
Tips:
- You might still schedule an activity to block off the time when you plan to make your calls.
- Use Find to group your contacts together, then tap Save and select Save Results as an Orbit to create a new one or Add to Existing Orbit if you've already created it.
- Want the orbit to be at the top of your orbit list? Or the bottom? No problem, tap More => Manage Orbits => Reorder and position the orbits where you'd like them.
- Don't want the Log entry that the contact was removed from the "call list" orbit? No problem, tap the Removed from Orbit Log entry and tap Delete. However, this might be a good way to segment your call lists based on what you named the orbit.
- To remove a contact from a orbit, while viewing the orbit list tap and drag the contact up to the red area that will appear at the top that says Drop here to remove from Orbit.
The answer is it's easy and just takes minutes to do using Backup My Stuff. Backup My Stuff is the only way to transfer your contact data to a new device without doing a full system restore from iTunes.
Note: These steps also apply if you wanted to remove VIPorbit and reinstall on the same device.
- First make sure you have an active Wifi connection and your Username and Password that you used with VIPorbit when first installing on your previous device. (If you've forgotten your password, as of 2.0 you can request to reset it. )
- Download VIPorbit from the App Store directly on your new device (make sure you're using the same iTunes account that you previously used to purchase VIPorbit) Or, sync your new device with iTunes on your desktop/laptop that you synced your last device with. If you download again from the App Store, make sure you download the same product as the first time...meaning if you downloaded the free/Lite version and upgraded within the app or you downloaded the full/paid version. The App Store sees these as different products. As long as you download the same one you will not be charged again and can download as often as you like.
- Tap VIPorbit on your new device to launch, then on the screen below populate the Username and Password you used on your previous device and tap the Login button. NOTE: It's IMPERATIVE you use your username and password that you were logged in with in VIPorbit when you made the in-app purchase of Backup My Stuff since that is what your backup data sets are associated with. If you cannot remember your password, tap the Forgot password link under the Login button and follow the instructions.

- On the next screen, select your country, then you'll see this screen below -- tap the Restore button.

- And on the last screen (below) it will display a list of your latest backup data sets. Tap the one you want to restore and tap to confirm. Lastly, the app will need to restart and then your restore is complete.

Question: "So, if I sync my device with iTunes, isn't that backing up my VIPorbit data?"
Answer: NO! When iTunes says it is backing up your device, it means it is backing up the app downloads and/or purchases you have made between devices. It knows you have downloaded and/or purchased VIPorbit, that is it. To backup all of your data in VIPorbit, including your pick lists, orbits and any other customization you've made you must use Backup My Stuff. It's easy, convenient and reliable keeping EVERY version you backup which you can restore to at any time.
NOTE: An active Wifi connection is required any time you backup or restore. This is for you protection to prevent any excess data charges from your cellular carrier.
All contacts are included the first time you import from the iPhone address book. Any groups you have in your Address Book are also imported as Orbits. Subsequent imports from More > Reports, Imports & Export >Import will *only* import contacts that have been added to the iPhone address book since the last import.
Changes made to existing contacts are not reflected in VIPorbit.
If you delete contacts from your iPhone address book the contacts will *not* be deleted from VIPorbit.
VIPorbit will automatically import your contacts after you register with us, if you choose to import directly. You may also choose to import later. If you use MS Outlook, Google or any number of CRM/contact management applications, you can synchronize these contacts to your iPhone address book then use More > Reports, Import & Export > Import to import newly added contacts to VIPorbit.
Note: Changes made to existing contacts are not reflected in VIPorbit on subseqent Imports. Along those same lines, if you delete contacts from your iPhone address book the contacts will *not* be deleted from VIPorbit.
VIPorbit imports contacts directly from your iPhone's Address Book by answering Yes when you're installing or later by tapping More => Reports, Import & Export => Import => Import Contacts.
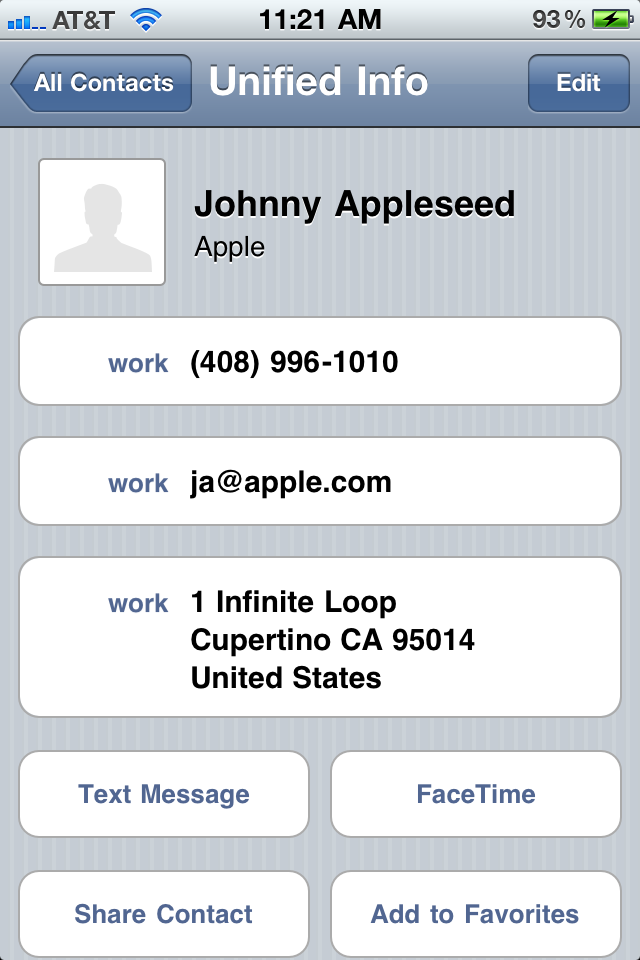
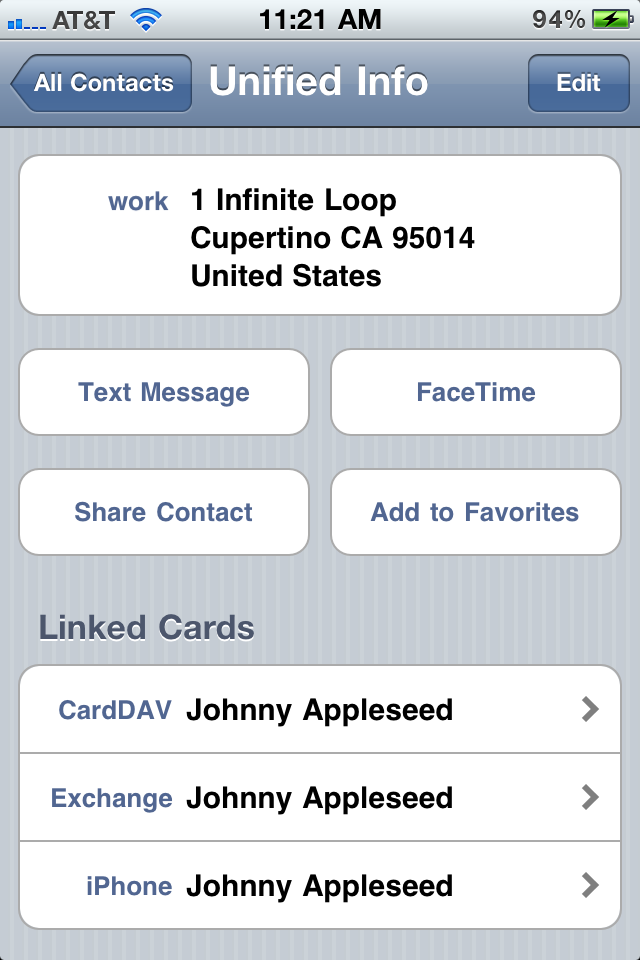
One of the items in Apple's iOS 4.0 update was a feature that combined contacts into a view entitled Unified Info in the Address Book's All Contacts list. Contacts from multiple synchronization sources (MobileMe, your Mac, Exchange) that are an *exact* match on first and last name will automatically get "combined" in this unified view. At the top of the contact card it will say Unified Info. At the bottom of the contact card you'll see an area labeled Linked Cards which will tell you which Contact source the duplicate contacts emanate from. When VIPorbit imports, it correctly sees these contacts as individuals and imports them all.....it cannot know which contact "wins".
Here are sample screen shots. This iPhone is syncing with Yahoo contacts, Google Apps and the Mac address book (the latter uses iSync which the source can be MobileMe or Google or others):
Solution
The solution is to de-dupe your iPhone's Address Book then re-import into VIPorbit. After deduping, delete the VIPorbit app and reinstall via an iTunes synch. You will not need to register again. You'll enter your user name and password then you'll be prompted to Import your contacts.
To De-dupe
There are multiple sources in the Apple Support forums that provide instructions for this, but here are a few suggestions. One of the quickest ways to correct the duplicate contacts is when synchronizing your iPhone with your desktop/laptop. With your device selected in iTunes click on the Info menu area at the top of the screen and see if you have a check mark by Sync Address Book Contacts. Uncheck this and re-synch to your iPhone. Check your All Contacts list in the iPhone's Address Book and see if that corrected your duplicates. Another way to eliminate duplicates is to temporarily turn off an account that provides Contacts (Exchange, Google Sync via Exchange, Yahoo CardDav, etc). On your iPhone tap Settings => Mail, Contacts, Calendars, select the account and tap the slider for Contacts so it reads OFF. After you import into VIPorbit, you can turn this back on if you wish.
Multiple entries on your calendar after first importing into VIPorbit most often comes from multiple copies of the same calendar created by MobileMe and/or from additional Google calendars. There are a few ways to correct this.
Solution One: Delete or uncheck the duplicate calendars
- From iCal on your Mac/iMac, go to Preferences and click on Accounts. Delete or uncheck any duplicated calendars.
Solution Two: Modify Calendar Syncing in iTunes between your desktop/laptop and iPhone
- Connect your phone to your desktop/laptop and iTunes will load and prepare to sync
- In iTunes, click on your device on the left-hand side of the screen
- With the device highlighted, click on the Info option in the top menu bar area
- Under 'Sync iCal Calendars' choose just the calendar(s) that you want to sync and avoid choosing those calendars that will have duplicate activities
For either solution the calendar will need to be refreshed with an app restart to see the changes take effect. Double-tap your iPhone Home button, hold down for 1 second on VIPorbit (or any running application icons) and tap on the red '-' at the top left of the icon to force quit.
Yes. We will automatically import it for you during the VIPorbit installation. At any time you can go to More => Calendar Preferences => and change Import Events to OFF to remove them.
Did you know that if you have a physical address under a Contact's Detail Screen and tap on it that it takes you straight to Google Maps? Get directions to your contact's physical address simply by tapping on it under the contact detail screen.
Simply by tapping on the address under the Contact's Detail Screen, you go straight from the app to Google Maps where you can view the address or even get directions to them.
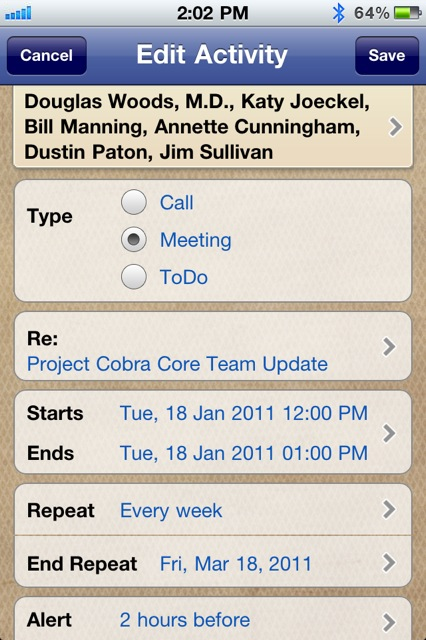
Yes! If it is a new activity that you are entering in and you would like to add a note to it, you can enter one under the “Re:” (Regarding) tab. You may also add to your Picklist of preselected options as well if you know you will be entering in the same thing multiple times. Once you complete the activity, you can enter an outcome (which can also be made into picklists) and also add any content to the ‘Notes’ tab as well. *All Notes and Activity Outcomes are automatically logged under the contact that you created the activity with.
To view events from your Google Calendar events in VIPorbit, access your Gmail account in the iPhone Settings > Mail, Contacts, Calendars and turn the Calendars setting 'On'.
Yes! Any picklist item can be deleted simply by swiping your finger on the right-hand side of the list and the red “Delete” button will appear. Anywhere where there is a picklist as an option is applicable.
To move contacts between Orbits, simply just drag and drop from one Orbit to another. Tap on an Orbit to view the list of contacts. Tap and hold a contact, drag the contact to the target Orbit tab and drop. A message presented in a green highlight bar at the top of the screen will confirm that you are dropping the contact into the intended Orbit.
You can remove a contact from an Orbit two ways:
- While in an Orbit contact list, tap and hold the contact and drag it to the top of the screen where you see the message "Drop here to remove from Orbit". A message will confirm that the contact has been removed from that Orbit.
- While on a Contact, tap the Orbits icon and swipe the Orbit you want to remove the contact from and tap Delete to confirm.
NOTE: Remove a contact from an Orbit does not delete the contact. Contacts always remain a member of the All Orbit.
The calendar in VIPorbit is updated each time you enter the app. If you close VIPorbit and open it again, the calendar is updated. If you switch to a different app, or even answer a phone call, then switch back to VIPorbit the calendar is updated then as well.
Changes made to existing contacts in your iPhone contact list will not be reflected in VIPorbit. For example, if you change the phone number for an existing contact in your iPhone contact list, the phone number will not change in VIPorbit.
However, any new contacts will import into VIPorbit. Tap More > Reports, Import & Export to add newly created iPhone contacts to VIPorbit.
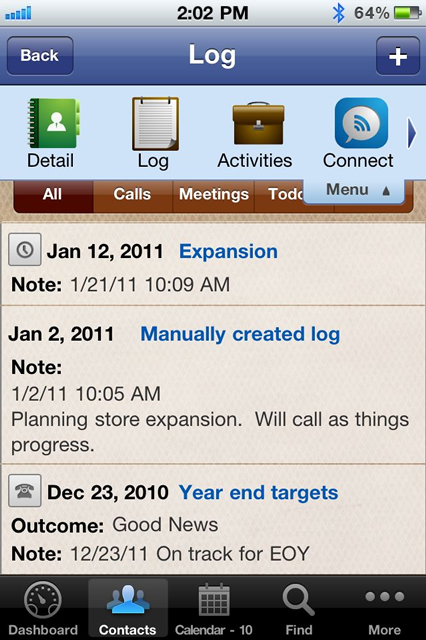
Most of the log entries are created automatically. However, you can also create manual log entries. So when does VIPorbit create log entries?
Automatically created logs
VIPorbit will automatically create a Log entry in the following instances:
1. From the Connect options: Phone, SMS, Email, Facebook, Twitter, Skype. The following is included in the log entry:
- Notes
- Completed date
2. When updating a User field, the following actions are logged:
- Changing the user field Title in More > Customize Fields > User Defined Fields
- Changing the user field Type in More > Customize Fields > User Defined Fields
3. When adding or removing a contact from an Orbit. The log entry contains the following:
- Notes
- Completed date
4. When completing an activity the following is included in the log entry:
- Completed date
- Outcome
- Notes
Manually created logs
To manually create a log entry, from the contact screen tap the Log button and tap the '+' in the upper right corner.
With Activity ON the following is saved to the Log entry:
- Activity type
- Re:
- Start and end date
- Outcome
- Notes
- Completed date
With Activity OFF the following is saved to the Log entry:
- Completed date
- Notes
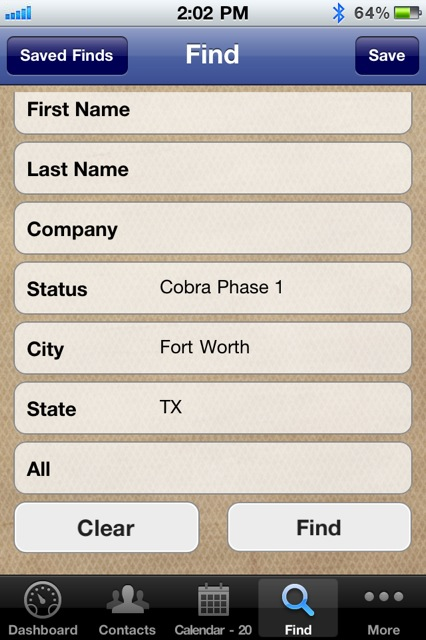
An Ad Hoc List allows you to refine a search to find and group an exact set of contacts that might be otherwise unrelated.
To create an Ad Hoc List tap Find > {enter search criteria, e.g. State=TX} > Save > Add to Ad Hoc List.
Tapping Edit from the Ad Hoc List allows you to remove contacts from the list. For example, Tap Edit > Remove Set from Ad Hoc List > {enter search criteria, e.g. City=Dallas} > Search > tap the Trash Can in the upper left corner and confirm. Now you have an Ad Hoc List of contacts in Texas that are NOT in Dallas. Tapping Edit again allows you to save the list as a new Orbit or continue refining the list.
To add contacts to an Ad Hoc List create your list as above. While in the list, tap Find twice. Clear the Find screen and type in new criteria, e.g. State=OR and tap Find. Tap Save > Add to Ad Hoc List. Now you have a list of contacts in the states of TX and OR.
Reports are generated and sent as a file attachment to the email address in More > Owner Info. The attachment is a plain text (.txt) file which allows you to easily format the report using the word processing application of your choice.
You can run a report for All Contacts, the Most Recent Find, or an Ad Hoc List. The Most Recent Find and Ad Hoc lists are determined by actions you take in Find.
The report contents are as follows:
Orbit List
A simple list of all Orbits. This report does not list the contacts within the Orbits
Contact Detail
First Name/Last Name
Company Name
Title
Phone Numbers
Email Addresses
Website
Address line 1
Address line 2
City, State/Province ZIP
Country
Sec Address Line 1
Sec Address Line 2
City, State/Province ZIP
Country
User fields 1 – 6
Log – 10 most recent entries
Simple List
First Name Last Name
City
Phone Numbers (all, with type)
Email Addresses (all, with type)
Completed Activities
First Name Last Name
Log Entry
Outcome
Note
Custom Export
The Custom Export reporting option allows you to tag the fields you want to export. The export creates a delimited (CSV) file which is then easily imported into a spreadsheet or any application that supports delimited file import.
Tap Find to quickly search for contacts in a certain geographical territory or by a 'status' you are using to organize your contacts. Use the All field in the Find screen to search all contact data for a specific criteria including log entries.
For more complex searches, see Ad Hoc.
Go to the More > Calendar Preferences and change Import events to "Off".
There are two ways to permanently delete a contact.
1) Using the Drag & Drop feature, if you are in the ALL Orbit.
If you are in a custom Orbit, Drag & Drop to delete only removes the contact from that Orbit but the contact is not permanently deleted.
2) Tapping Edit from the Contact List in ANY Orbit will permanently delete the contact.
*When using Drag & Drop to delete, or by tapping 'Edit' on the Contact List, you will receive confirmation before VIPorbit permanently deletes the contact.
Yes. There are multiple reports from which to choose.
Tap More > Reports, Import & Export > Reports & Export. Choose a report. VIPorbit will create the report and automatically attached it to an email to be sent to the email address indicated in More > Owner Info > email address. You can also add multiple email addresses to the share the report with others. Tap Send and the report is sent to the recipients as a .txt file that can be viewed in any text editor or word processor.
To see what is included in the reports, refer to the "What fields are included in the Reports?" FAQ.
TIP: When you view your report in a word processor you can enhance the formatting and print a hard copy for future reference.
The information you enter about yourself on the Registration screen is used as the Owner Info in More > Owner Info in the app. Any changes you make will automatically update our records.
The username is used for authentication if you need to re-download VIPorbit from the App Store and more importantly, when you access backup copies of your data after purchasing Backup My Stuff.
The email address is used by VIPorbit when emailing your reports created from More > Reports, Import & Export.
You can change this information at any time.
NOTE: Per our Privacy Policy, we DO NOT share your data with anyone. Privacy Policy
To use VIPorbit to post a message on a contact's Facebook Wall:
- Go to a contact record.
- Tap on the Connect button and tap on the Facebook icon.
If the icon is "grayed out" it means you have not yet entered a profile name. Tapping the icon will prompt you to enter the data. Now tap the icon and follow the prompts to post a message to the contact's Wall.
A date stamped entry is automatically in the Log indicating that you sent a message via Facebook. VIPorbit even leaves an app signature on their wall letting them know that you sent that message via VIPorbit.
NOTE: When entering in the Facebook name for contact, make sure that the spelling and capitalization is exactly the way it is on the Facebook profile.
If you want to add a quick note first choose the contact by tapping on a name from the Contact List or using Find.
From the Contact Detail screen tap on Menu in the upper left of the detail screen. Select Log and tap '+' to create a new log entry. You can choose call, meeting or todo to record an activity that was not scheduled and add a quick note ore record the outcome of the activity. Or, you can turn "Activity" OFF to add a note that is unrelated to an activity.
To use VIPorbit to send a direct message (DM) using Twitter:
- Go to a contact record.
- Tap the Connect button and tap on the Twitter icon.
If the icon is "grayed out" it means you have not yet entered a Twitter name. Tapping the icon will prompt you to enter the data. Now tap the icon and follow the prompts to post your tweet.
A date stamped entry is automatically in the Log indicating that you sent a direct message via Twitter.
You sure can! Things come up, meeting times change, etc., whatever the case may be, VIPorbit has you covered!
If you tap the “Edit” button, you will be able to change all the fields of the activity. Tapping on the date and time will bring up a date/time spinner.
The “Outcome” button can be filled with a selection from a pick list. After tapping on the “Outcome” button, you are prompted to enter the outcome field manually, to use items from the pick list, or to add to pick list. Choosing the last option will enable you to put standard answers in the pick list that you use a lot. Don’t worry about having to fill the pick list completely for now, as you use VIPorbit more and more, you can start adding, changing or deleting items.
You can delete a contact one of two ways:
- Go to the Contact List by tapping on the Contacts nav button. Press “Edit” in the upper left part of the screen. Tap on the red delete icon next to any contact to delete.
Or - Tap the All Orbit. Press and drag a contact up to the top area that will turn red with an X - Drop here to permanently delete.
CAUTION: If you confirm the delete, the contact is permanently deleted.
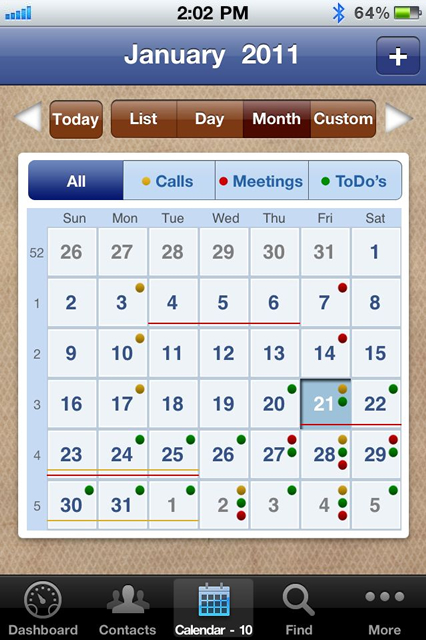
The yellow dot represents a scheduled call, the green dot represents a scheduled meeting, and a red dot represents a scheduled ToDo. This will give you a high level glance at your monthly schedule.
Create the report from More > Reports, Import & Export. The report is emailed as an attachment to the address indicated in More > Owner Info. The report is a standard text (.txt) file and can be opened with any word processing program for formatting and printing. Or, you can open the report directly from the email and print from there.
There are two ways to do this. Either double-tap the orbit tab, or tap More on the nav bar and tap Manage Orbits.
Yes. Go to More > Calendar Preferences > All-day activities at bottom of list. Change the setting to ON to have your all day events appear at the top of the activity List view.
When setting a passcode from More > Set Passcode you have the option to set two security questions. If you forget your passcode you will be asked to verify the answers to your security questions. When you answer correctly your security code will appear.
For your security, we do not have access to your passcode if you forget it.
Tap Edit in the upper right on any Contact Detail screen. Tap Add Photo. You are given the option to choose a picture from the Camera Roll on your iPhone, or can use the Camera to take a picture right now.
*Currently you cannot add photos stored in Albums on your iPhone.
Faves is a default Orbit that allows you to group the people you contact most.
To add a contact to Faves, go to the contact and swipe left or right to the Phone Numbers detail screen. Tap Add to Faves and select the dialing, email and SMS options you want to use communicating from the Faves Orbit. If you do not see some, or all, of the communications options you will need to edit the contact details and add phones numbers and/or addresses.
To remove a contact from Faves, access the contact detail screen and tap Remove from Faves.
Connecting to a contact from Faves does not create a log entry. Use Faves for calls to family, friends or any contact that does not necessitate a Log entry.
NOTE: You cannot drag and drop to faves.
Absolutely not! We know the value of keeping your information Yours! We promise not to share anything with any third party.
To view our privacy policy go to https://viporbit.com/privacy
Use picklists to make entering data easy and consistent while minimizing typing. For example, if you have certain predictable Outcomes for associated with phone calls like 'Send Quote' or 'Scheduled Demo', then use this information to populate the Outcome picklist.
User Defined Field picklists allow you to further organize contacts and make searching for matching contacts using the Find feature easy and predictable.
To customize picklists go to More > Customize Fields and tap to the area you want to customize.
Yes. When you generate the report, you can include additional addresses by tapping in the To: field of the email generated by VIPorbit.
Nope! We have taken care of that for you. Although all iCal events that are imported into VIPorbit are Read Only and cannot be deleted from iCal via VIPorbit.
There are three ways to add Contacts to an existing Orbit
- From any the Contact List, tap and hold a contact and drag it to the target Orbit. A green highlight bar will appear at the top and verify that you are dropping the contact on the desired orbit.
- From the contact record, tap the Orbits button. Tap '+' in the upper right of the screen to add the current contact to one, or many, existing Orbit(s).
- Use Find to run a search. When you've found the contacts you want, tap the Save button in the upper right of the screen and select the Add to Existing Orbit button. From there it brings up a list of all existing Orbits where you can check one or many Orbits to add them to.
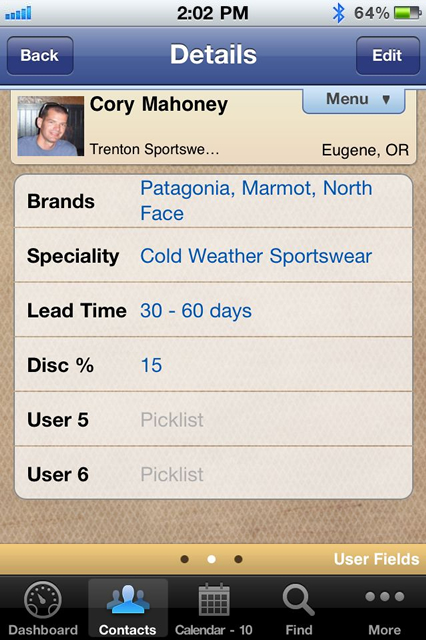
User Fields allow customization to fit your specific needs of further information you would like to track with each of your contacts.
Ex: Hobbies, Birthdays, Degrees, Certifications, etc.
Bottom line, the User Fields are meant to fit what YOU want to track with your contact.
Double tapping the Contacts tab will take you to the Contacts list from any area in the app.
No. Connecting to a contact from Faves does not create a log entry. Use Faves for calls to family and friends that do not necessitate a Log entry.
There are two special Orbits. All and Faves. All is just that. It is all of your contacts. Faves is for the people you contact most often. Put them in the Faves and you have an instant way of contacting them.
There are 3 different Contact Detail Screens for each of your contacts.
Screen 1) Phone Numbers: This is where you add and view the contact's Phone Numbers, Email Addresses, Assistant (if applicable), Status (e.g. Client, Prospect, Family, Business, Personal, etc.). You may also Add to Faves from here or Copy Contact.
Screen 2) User Fields: This is where you add and view your 6 customizable User Fields (e.g. Hobbies, Fan of, Reminder, Hobbies, etc.)
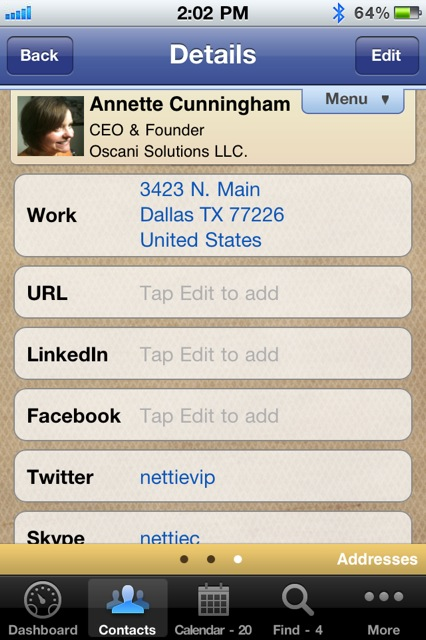
Screen3) Addresses: This is where you add and can edit the contact's physical address, URL, Facebook, Twitter and Skype info.
*Notice the three dots on the bottom of the screen. This indicates the detail screen you are on.
Use the Status field to categorize your contacts for running reports or quick access using Find. (For example, populate the Status picklist with values like Customer or Prospect if you are in sales or use Corporate or Personal if you’re a tax accountant.)
The country will only display if it differs from your country that you entered during registration or edited in More > Owner Info.
To change the sort order of the Contact list, go the iPhone Home screen and tap Setting > Mail, Contacts, Calendar and look under the Contacts section. You will need to force quit* VIPorbit and restart for the changes to take effect.
*Double-tap your iPhone Home button, hold down for 1 second on any of your running application icons and tap on the red '-' at the top left of the apps that you wish to force quit.
Use Orbits to group otherwise unrelated contacts or to organize your contacts in a way that is meaningful to the way you do business. For example, a realtor may create Orbits for Clients or Mortgage Lendors. You might have an orbit for your Golf Buddies, Family or Softball Team members. Orbits can also be used to manage projects that come and go such as Baby Shower, Birthday Party or Company Event you're organizing. All the guests or businesses associated with the project would be in the Orbit. When the event is over, you can just delete the Orbit, the contacts will still remain.
Orbits allow you to customize the way you manage your relationships.
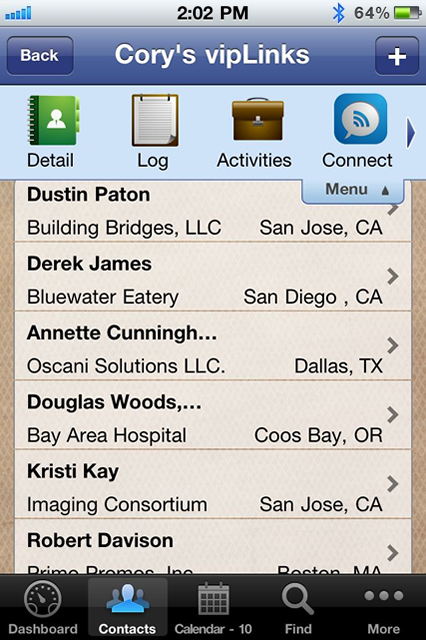
vipLinks are used to create and leverage connections between contacts. vipLinks expand the lineage of relationships and build an instant credibility level with new connections or contacts. Use vipLinks to further organize your contacts and build a network of contacts or connections that are specifically influenced by this contact.
One example: You find out that a colleague happens to know someone that you already have a relationship with so you add that person's contact record to your colleague's vipLinks. It's really six degrees of separation if you will.
Another example might be transaction based: Say you are a Real Estate agent and you have a closing approaching with a buyer that is your client. You might use vipLinks to connect all the participants of that transaction to your client: the title company, mortgage broker, the home inspector, etc. vipLinks connects them and builds your sphere of influence.
Bottom line, the flexibility is there for VIPorbit's features to work the way you do!
Create the report from More > Reports, Import & Export. The report file is emailed to the address indicated in More > Owner Info. From you email application, open the message and save the report file to disk. Now you can open the file with any word processor using the option to open a text (.txt) file.
Data tables are presented in Comma Delimited, CSV text file format. Although this file format allows for the data table to be easily retrieved into a variety of applications, they are best viewed within one that will allow one to easily manipulate data that is in columnar format. Common examples of such applications are those that are used to create spreadsheets and databases.
If you don't have access to either a spreadsheet or a database application, you can also retrieve the data table file into either an ASCII text-editing or a word-processing application. However, since neither of these two application types has the facility to easily format the width of the data columns, quite a bit of manual reformatting will be required to properly view the data.
To export your contact data in this format, go to More => Reports, Import & Export => Reports & Export> and select Custom Export. Next it will bring up a list of all available fields you can include in the file. Select the ones you want then tap Done. It will create the file and bring up a new email message prepopulated with your email address from the Owner Info. You can always add or change the email recipients. The export file will sent as an attachment on the email.
Go to More > Owner Info. Once you're there, you can edit your email address.
To remove a contact from Faves, access that contact's detail screen and tap Edit Faves then Remove from Faves.
There are two ways to go about this:
- You can erase the activity in which case it will disappear from your database all together. That means it will also not appear in your log file.
- The other option is to complete it by tapping the “Complete” button. You can tap on ToDo's from the Dashboard, select the activity you wish to complete, tap Complete and you will be given the option to add an Outcome or even a Note about the activity. Under Outcome you are able to either enter manually or add to a pick list if you feel that you will have the same outcome often (e.g. Closed deal, Set up next meeting, etc.) Once you choose to either enter an outcome or not, simply just tap Complete and that activity will be logged in the contact's log detail but a line will also be crossed through that activity showing that it has been completed.
When you schedule an activity within VIPorbit, a big advantage is that the result is recorded into the log. That means that in the future, you'll be able to see in one instance how your relationship came about with this contact. After you have completed the activity, you will want to easily enter a value through a picklist. But a value for "regarding" for a call is most likely different than a "regarding" of a meeting or a ToDo.
Located on the bottom right of the tab bar within the app is the "More" tab. The fourth feature down is the "Manage Orbits" feature.
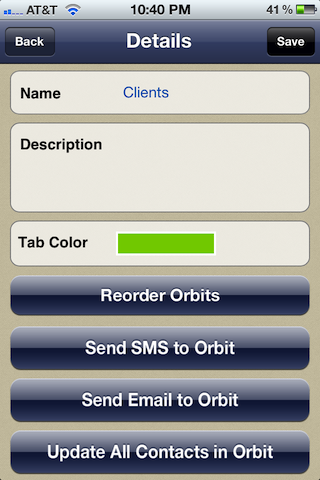
Managing your orbit list will make you use your orbits more effectively. On the one hand, you can create new orbits here, just like you can from within the contacts screen, but just as important, you can reorder the orbits here. Let's say that you have created an orbit with contacts of a new project that you are starting. By default, the new obit will be last in the list. If you work with this orbit more often than you do with other orbits, you might want to move the orbit to the top of the list.
By the way, top of the list, means on top, but below the All orbit and the Faves orbit.
When scheduling an activity, when you tap the Starts and Ends feature you will see at the very bottom an All Day option. By turning On, the Time and Date picker will automatically change to just a Date picker. The activity will now bet set as an "All Day" event. In the Calendar, this will show at the top of the day view.
There are two ways that you can add a new Orbit:
- On the Contacts screen press the '+' at the top right of your screen. There you can create a new contact and/or create a new orbit.
- More > Manage Orbits > Create New Orbit
This is your ticket in contacting us here at VIPorbit. You can send us a question or comment, or even follow us on Twitter, Facebook, LinkedIn and view our YouTube channel.
If the "i" is wiggling it means there's a message waiting. We send out tips, tricks and product announcements on a regular basis.
If you have the Lite Version of VIPorbit, which lets you manage up to 100 of your relationships, this is also where you can upgrade to the Full Version.
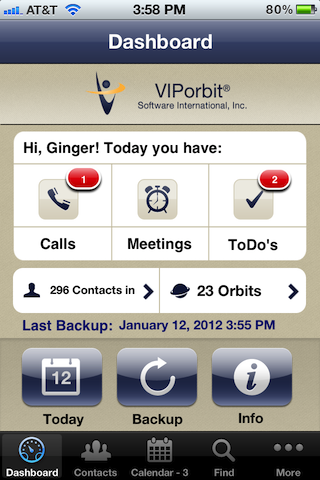
The Dashboard is your starting point and overview area. It's the very first screen you see when you load VIPorbit. It shows you what Calls, Meetings and ToDo's you have for the day. This is where you access 'Backup My Stuff'.
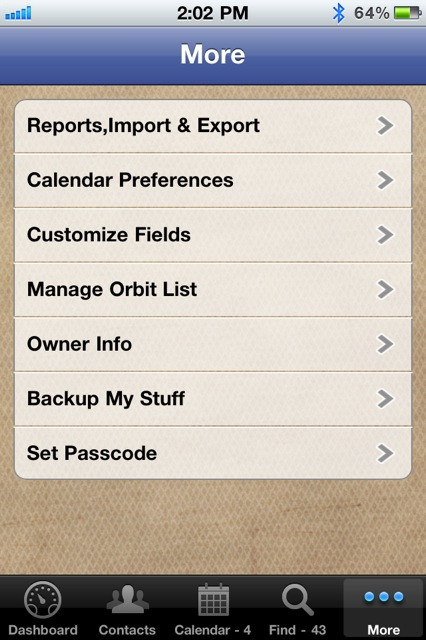
There are many features in the More tab that allow you to customize VIPorbit to your specific needs.
There are 7 Tabs to choose from:
- Reports, Import & Export
- Calendar Preferences
- Customize Fields
- Manage Orbits
- Owner Info
- Backup My Stuff
- Manage Security
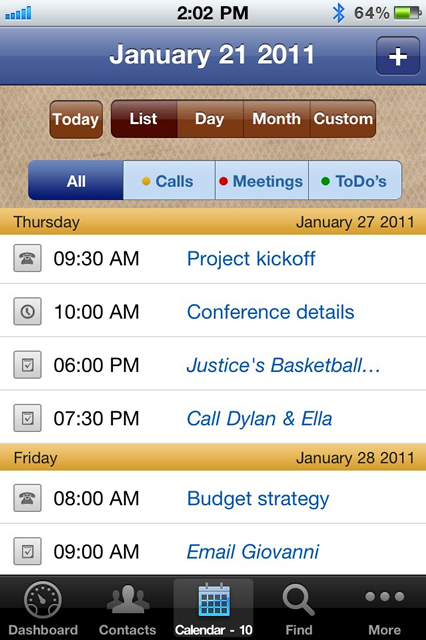
The calendar is your hub for all of your Calls, Meetings and ToDo's. It not only shows the activities you schedule from within VIPorbit, but your iPhone calendar items as well.
*All calendar events that you import from iCal are Read-Only and can not be edited or deleted in VIPorbit. iCal events are edited and deleted within iCal.
To view events from your Google Calendar access your Gmail account in the iPhone Settings > Mail, Contacts, Calendars and turn the Calendars setting 'On'.
You must be following the contact on Twitter in order to use the Twitter Connect feature to communicate.
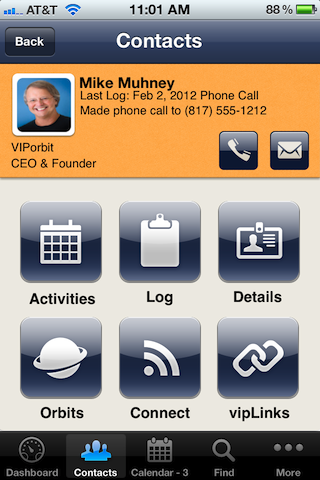
Tapping on a contact, the screen has 6 different icons.
- Activities- This is where you can see what you have scheduled with that contact. What differentiates this view from your calendar view is that it only pertains to that single contact and what you have scheduled with them. The Calendar view has all activities with all contacts listed.
- Log- The Log feature lets you see everything that you have done with that contact and many actions you take in VIPorbit will generate an automatic log. You can view All logged details or select specific details that you may want to look up. (Calls, Meetings & To-dos)
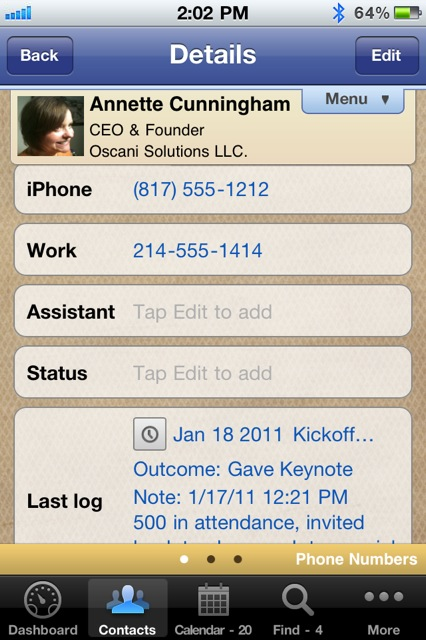
- Details- This is where you can view the contact's Phone Number(s), Email Address, Assistant (if applicable), Status and Last log. From here you may also add this contact to Faves and Copy Contact.
- Orbits- You can view which orbits this contact belongs to, add this contact to another existing orbit, or create a new orbit with this contact.
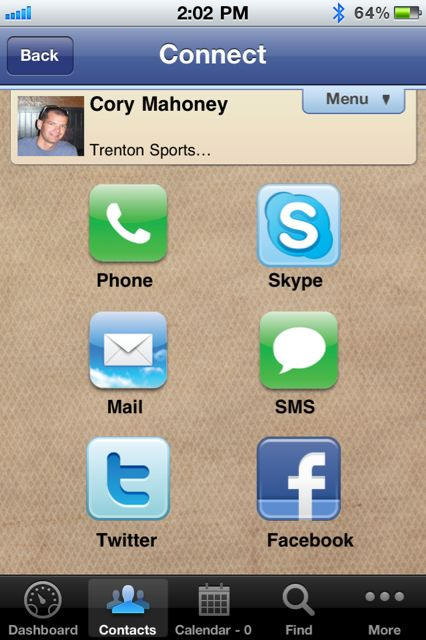
- Connect- The Connect icon enables you to connect to that contact in several ways. You can connect by Phone, SMS, Mail, Skype, Twitter and Facebook.
- vipLinks- This helps to further organize you contacts. Basically it is a list of contacts that this contact is linked to. You can build a direct network of contacts or connections that are specifically influenced by this contact.
There are two different ways to delete an Orbit:
- On the Contacts screen where you can view all of your Orbits on the lefthand side of the screen simply double-tap the Orbit you wish to delete. Swipe to the bottom of the screen and tap the red Delete Orbit.
- Tap the More tab on the dock at the bottom right of VIPorbit > Manage Orbits > then tap on an Orbit. The steps from here are the same as above.
Deleting an Orbit does not delete the contacts within. The contacts can still be found in the All Orbit or in any other Orbit you may have added them to as well.

- Experience you can Trust.
 Get VIPorbit
for iPhone and iPad
on the app store
 vipSync
Have multiple devices?
Avoid double entry
Backup My Stuff
Safeguard your contact
data with ease.


